Although Kayako comes with five pre-built user roles, with varying degrees of power and access, that's not always enough. If you're on the Enterprise plan, you'll also have the option to create custom user roles, to suit your team's needs.
Perhaps you have a self-service team that needs control over Help Center content, but won't be updating or responding to conversations. Create a new 'Self-service' user role. Or maybe you want your team leads to be able to add and modify custom conversation fields. Build them a 'Agent + Conversation Fields' role. For each custom role you add, you can fine tune their permissions so they have as much or as little access as they need.
In this article, we'll look at the types of custom roles you can create, and then walk through the process of building one.
Understanding the two types of custom user roles
As the heading above suggests, there are two types of custom user roles you can create in Kayako: agent roles and administrator roles. For each custom role you create, you'll choose one of these role types. The role type determines which permissions you can choose from for the new role.
Custom agent roles are based on the permissions for the default 'Agent' user role. Custom administrator roles are based on the permissions for the default 'Administrator' role. If you need a refresher on which default roles have which permissions, refer to our user guide article about assigning roles.
Once you choose a role type, you'll be able to assign any variation of those permissions that you'd like. Next, we'll look at the actual process of adding a new user role.
Adding and configuring a new user role
Defining custom user roles is a great way to let each member of your support team play to their strengths. Let's say you have a couple of senior level support advocates, who are really excited about building automated workflows. You can create a custom administrator role to grant them access to Kayako's automation-related features, in addition to their regular agent-level access.
NOTE: To modify user roles and permissions in Kayako, you will need an administrator account with the 'Modify roles and permissions' permission. (How very meta.)
To add a new user role:
- Sign in to Kayako and go to the admin area.
- Under the 'People' heading, click the Roles and permissions link.
- Here, you'll see the default user roles, and any custom roles that have been added already. Click the Add new role button.
- In the Role name field, type a descriptive name for the new role. For our automation example, let's go with 'Agent + Automations'.
- From the Role type dropdown, select 'Administrator'. This will reveal the full array of permissions to choose from.
- Since we want our new role to include all of the normal agent permissions, leave everything in 'Conversations', 'Messenger', 'Users and organizations', and 'Help Center' checked.
- Uncheck everything in 'User administration'.
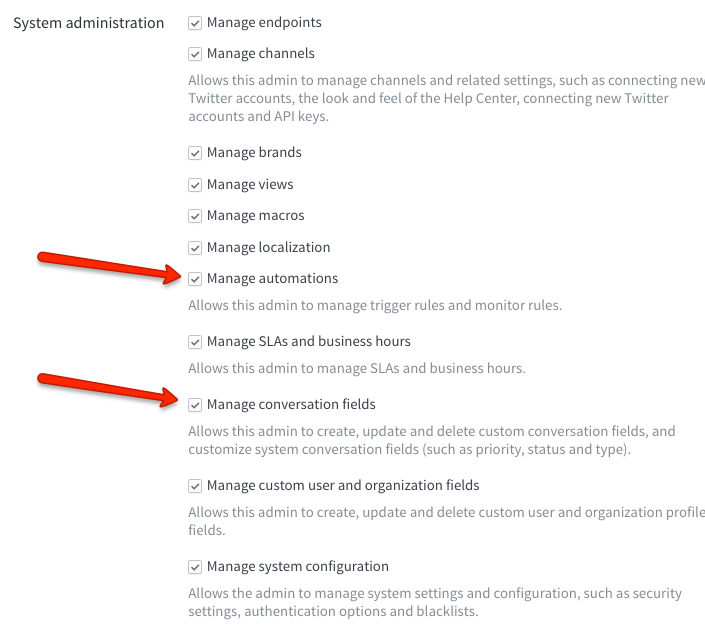
- Uncheck everything in 'System administration', except for Manage automations so they can create triggers and monitors and Manage conversation fields so they can use conversation fields to refine their workflows. The bottom of the page should look like this:
- Click the Save button to create your new role.
Now all you have to do is edit the user profile for your ambitious staff users, and assign them to the new role.
Kelly O'Brien