Kayako offers a range of account security options that allow you to control how your users access the system. From restricting users from certain domain and IP addresses to establishing strict password and authentication standards, you have a lot of options for configuring the security of your Kayako.
NOTE: Learn more about how Kayako safeguards your data on our product security page.
In this article, we'll walk you through defining security defaults for user logins, creating password policies, and setting IP restrictions for staff access. We'll also cover the configuration options available for user registrations.
NOTE: To edit any of these security and user registration settings, you will need an administrator account with the 'Manage system configuration' permission.
Setting login security policies
You can specify when user sessions expire, how many failed login attempts are allowed, as well as how often account passwords expire. These all serve to protect Kayako from unsafe sessions and outdated passwords.
To manage your login security policies:
- Sign in to the admin area.
- Click on Policy in the sidebar.
- Choose either the 'Agents' or 'Customers' tab at the top. The configuration options will be the same for both types of user.
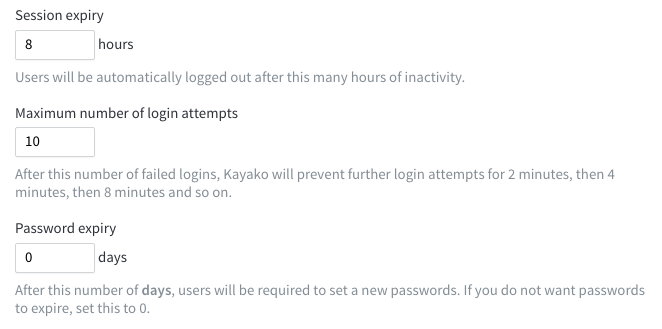
- In the 'Security policy' section, you'll see several options:
- In the Session expiry field, set the number of hours a user can be inactive before they're automatically logged out.
- In the Maximum number of login attempts field, choose how many failed login attempts Kayako should allow before locking the account for several minutes.
- In the Password expiry field, enter the number of days that your Kayako passwords should remain valid. Kayako will prompt your users to reset their passwords, once this number of days has gone by.
- When you've finished making your changes, click the Save button.
Setting password policies for customers and agents
Weak passwords can pose a security risk to any application, so it's best to define strict password policies to reduce the use of common or easy-to-crack passwords.
To configure password policies for your Kayako users:
- Sign in to the admin area.
- Click on Policy in the sidebar.
- Choose either the 'Agents' or 'Customers' tab at the top. The configuration options will be the same for both types of user.
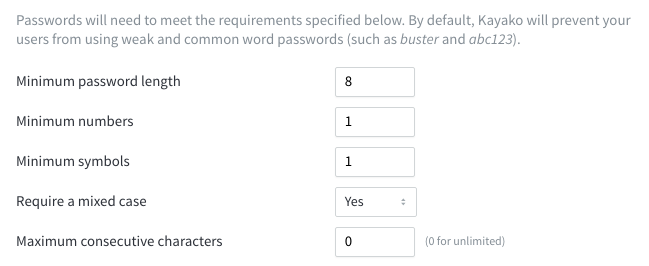
- In the 'Password policy' section, you'll see several options:
- Set the minimum length for your passwords, by entering a number of characters in the Minimum password length field.
- To require one or more numbers in every password, enter '1' or greater in the Minimum numbers field.
- To require one or more symbols in every password, enter the number of symbols to require in the Minimum symbols field.
- To require at least one lowercase and one uppercase letter in every password, select 'Yes' from the Require a mixed case dropdown.
- To prevent too many consecutive characters in your passwords, enter a number of repeats you'll allow in the Maximum consecutive characters field. For example, if you enter '2' here, your users won't be able to use 'sssecret' as a password. (No parseltongue allowed here.)
- When you're satisfied with your policy setup, click the Save button.
Defining IP restrictions for agent logins
For agent and administrator accounts, you can restrict login access to specific IP addresses. That means that your team will need to access your Kayako via one of the network IP addresses you specify. If they try to sign in from an IP address that's not on the list, they won't be allowed in.
To restrict agent login to certain IP addresses:
- Sign in to the admin area.
- Click on Authentication in the sidebar.
- Make sure you're on the 'Agents' tab, since the 'Customers' tab doesn't have IP restriction options.
- In the IP restrictions field, enter one or more IP addresses, each on a new line, from which your team should be allowed to access Kayako.
NOTE: You can enter full address, a range, or a specific subnet mask. - Click the Save button when you're done.
Allowing potentially unsafe HTML in Help Center articles
By default, Kayako will strip out potentially unsafe HTML tags (like <script> or <iframe>) from your Help Center articles, since they can be used to embed malicious code. On the flip side, though, these tags come in very handy when you need to embed forms and other rich media. So the choice is yours — you can leave the default restrictions in place, or allow these HTML elements to support self-service fanciness.
To allow your team to use these elements in your Help Center articles:
- Sign in to the admin area.
- Click on Settings in the sidebar.
- Make sure you're on the 'Agents' tab.
- In the 'Help Center Content' section, check the Allow potentially unsafe HTML in Help Center articles box.
- Click the Save button when you're done.
Configuring user registration options
You also have a range of options available for controlling new user registrations. With these features, you can prevent unregistered users from creating new conversations in your Help Center, you can require new registrations to pass a Captcha test, and you can list domains on either the blocklist or safelist, to limit who can register.
To configure your user registration options:
- Sign in to the admin area.
- Click on Administration in the sidebar. Navigate to Security/User Registration
- To prevent unregistered users from starting new conversations via email, uncheck the Allow new conversations from unregistered users box.
NOTE: With this unchecked, Kayako will suspend any new conversations from unregistered users coming via email. - To protect against spam accounts, click the Require CAPTCHA for new registrations box. With this option enabled, Kayako will ask new users to prove they're not robots, before they're allowed to register.
- Finally, for complete control over who can register for a user account, you can add email addresses or domains to either the Email blocklist or the Email safelist fields. Kayako will block new registrations — and suspend incoming messages — from any addresses or domains on the blocklist, and it will allow registrations and messages from those on the safelist.
- When you're done making changes, click the Save button to put them into effect.
Kushal Sharma