By adding your working hours to Kayako, you can make sure your SLAs and automations are only active when your team is active. Once you've defined your business hours, you can specify them when building SLAs. That way only your on-the-clock hours will count against your reply and resolution deadlines. You can also use them when defining your automations to prevent notification emails, surveys, or other automated actions from occurring when your team is offline.
You can create as many sets of business hours as you need. You can also add any holidays on which your team won't be available during their regular hours. That way, you don't have to worry about your team's response metrics taking a hit, when you're out of the office.
In this article we'll walk you step-by-step through the process for adding and configuring your support team's business hours.
Entering your business hours
Kayako comes with a default set of business hours predefined for Monday-Friday, from 9am-5pm, local time. But let's say you're splitting up your support team into technical support and customer service. Your technical support will be working those standard business hours, but your customer service team will be available for extended hours, six days a week. Let's walk through how to add a new set of business hours for them, so Kayako will know which hours they're active.
NOTE: To edit business hours in Kayako, you will need an administrator account with the 'Manage SLAs and business hours' permission.
To set your team's business hours:
- Sign in to Kayako and go to the admin area.
- Under the 'People' heading, click the Business hours link.
- Here, you'll see the default business hours, and any custom hours that have been added already. Click the Add new button to add the new extended hours for the customer service team.
- In the Business hours title field, add a descriptive title. In our example, we can use 'Customer Service Team'.
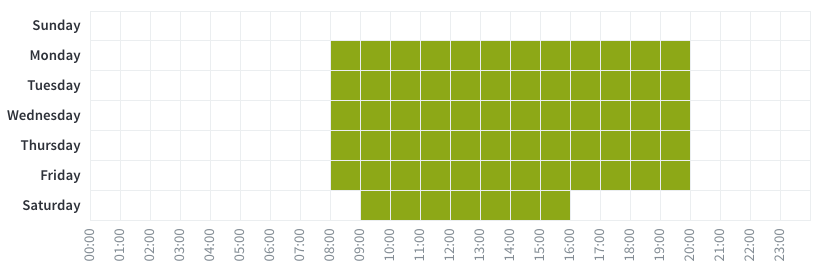
- Below the 'Business Hours' heading, you'll see a weekly timetable. Click and drag across the cells for the days and hours your team will be working. Let's say the customer service team will have coverage from 8:00-19:00 on Monday-Friday, and 9:00-15:00 on Saturdays. Your table should look like this:
- Scroll down to the 'Holidays' heading, where you can add any holidays that affect your team's availability.
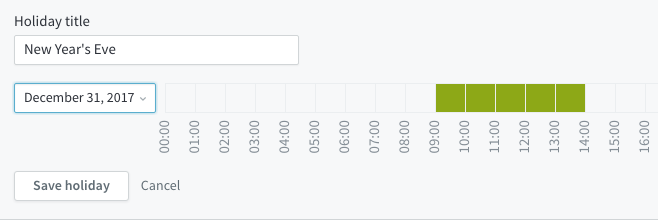
- Let's say your customer service team has a half day on New Year's Eve and the day off on New Year's Day. Click the Add a holiday button.
- In the Holiday title field, enter 'New Year's Eve'.
- Click the date dropdown, and select December 31st.
- In the table next to it, highlight the cells for '9:00' through '13:00'.
- Click the Save holiday button.
- Click the Add a holiday button again and repeat the steps above for New Year's Day, but leave the timetable empty.
- Click the Save holiday button.
- Repeat the steps above for any other holidays.
- When you're done, click the Save button to add your new set of business hours.
Note:The business hours timezone is defined based on your defaults time settings
And that's it! Now, when you create teams in Kayako for your technical support and customer service teams, you can select the appropriate set of business hours. Plus, you can customize your SLAs and automations to adjust for each team's active hours.
Kelly O'Brien