In our article on customizing your Help Center appearance, we introduce the basics of making changes to Kayako's look and feel. Virtually every corner of your customer-facing content — whether on the Help Center or in your automated emails and notifications — can be customized by making changes to whichever template governs its appearance. By editing these templates, you can control how your Help Center and communications appear to your customers.
In this article, we'll show you how Kayako's templating tools work, walk through how to make and save your changes, and give you a rundown of all of the templates you can edit.
Understanding how templates work
In Kayako, when we talk about templates we're talking about the HTML documents that control how your content is presented. You have editing access to the templates that control your Help Center, your automated emails, and your satisfaction surveys.
When editing templates, you'll be working primarily with four elements:
-
HTML code — Each template includes HTML code that provides the basic framework for your content.
This code is responsible for the layout and overall structure for the email or Help Center page. You can add to or modify this code just as you would for any other HTML webpage.
-
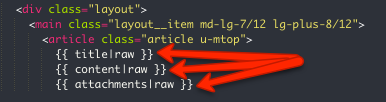
Content blocks — In addition to the HTML framework, you'll also see content blocks, which look like this:
Any time you see a set of double curly brackets in a template — i.e.,
{{ content-thing }}— this denotes a content block. Each block contains a predefined chunk of code that is then displayed when the page is rendered. We use content blocks in our templates for a number of reasons:- They make it possible for us to make improvements and updates to key pieces of the Help Center without disrupting any customizations you've made.
- They dramatically reduce the risk of breaking important Help Center functionality, when editing templates.
- They make Kayako's templates much less complex and easier to modify.
-
Arguments — While placeholders are used to specify dynamic content, arguments are more complex, and can be used to make conditional formatting changes to your templates.
You'll know you're looking at an argument if it's encapsulated in single curly brackets and percentage signs —
{ % argument-thing %}. Theifargument above is probably the most common, which will tell Kayako to display what comes after it only when theifconditions are met. But there are more than a dozen other arguments you can use to build complex conditional formatting changes. -
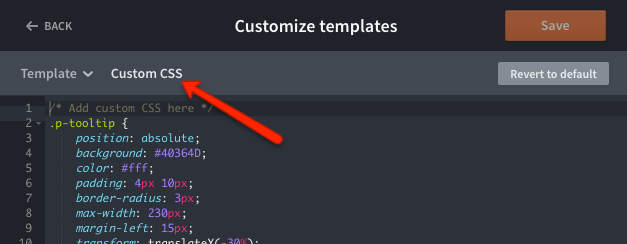
Custom CSS styles — The last element you might use while editing templates are custom CSS styles. CSS lets you define custom formatting for specific elements of your Help Center. You can add as many custom styles as you like, from the 'Customize' panel on the Help Center, by selecting Custom CSS from the toolbar.
Once you've defined a style, you can call it for any HTML element in any of your Help Center templates.
NOTE: Custom CSS styles are not available when editing your email or survey templates.


Now that we've covered the different elements that make up Kayako templates, let's have a look at how to make your own changes.
Making changes to your Help Center templates
Although there is virtually no limit to the things you can change in the Help Center templates, any change you make will follow the same basic steps.
NOTE: To customize the appearance of your Kayako Help Center, you will need an administrator account with the 'Manage channels' permission.
To edit a template:
- Sign in to Kayako and go to the Help Center.
- Click the Customize button on the upper toolbar.
- On the customization pane, click the Customize templates heading.
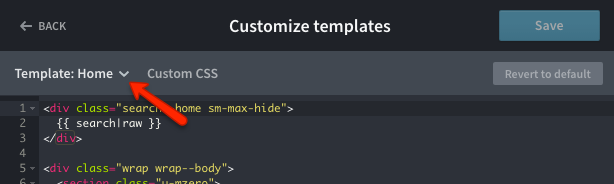
- From the Templates dropdown, select the
template you'd like to edit.
- Once you've selected a template, make your changes to the code.
- If you need to restore the original template, click the
Revert to default button.
NOTE: If you're editing a template that's already been customized, it's a good idea to make your own local copy of the template contents, in case you want to roll back only your most recent changes. - To add your own CSS styles, on the Custom CSS tab.
- When you've finished making your changes click the Save button.
- Back out of the 'Customize' pane, and refresh to make your changes live.
And that's it! You can jump right into your own editing project, or keep reading for a description of each of the templates that are available for editing, and a description of what each of them controls.
List of editable templates
| TEMPLATE | LOCATION | DESCRIPTION |
| Head | Help Center > Customization Pane | Anything that you need to
include in the<head></head>tags
for your Help Center, you can add to this template.NOTE: The contents of this template won't be displayed directly on your Help Center. |
| Header | Help Center > Customization
Pane |
Controls what appears in the header section of all of the pages in your Help Center. |
| Footer | Help Center > Customization
Pane |
Controls what appears in the footer section of all of the pages in your Help Center. |
| Home | Help Center > Customization
Pane |
Controls the Home page for your Help Center. Your changes will be reflected on https://yourcompany.kayako.com. |
| Category | Help Center > Customization
Pane |
Controls the category landing pages on your Help Center. Applies to any pages whose URLs look like this: https://yourcompany.kayako.com/category/##-category-name |
| Section | Help Center > Customization
Pane |
Controls the section landing
pages on your Help Center. Applies to any pages whose URLs
look like this:
https://yourcompany.kayako.com/section/##-section-name |
| Article | Help Center > Customization
Pane |
Controls the article pages on
your Help Center. Applies to any pages whose URLs look like
this:
https://yourcompany.kayako.com/article/##-article-name |
| Login | Help Center > Customization
Pane |
Controls the login page for your Help Center. Your changes will be reflected on https://yourcompany.kayako.com/login. |
| Signup | Help Center > Customization
Pane |
Controls the sign up form for
your Help Center. Your changes will be reflected on
https://yourcompany.kayako.com/signup. |
| Profile | Help Center > Customization
Pane |
Controls the user profile
pages on your Help Center. Your changes will be reflected
on
https://yourcompany.kayako.com/profile/edit. |
| Search | Help Center > Customization
Pane |
Controls the appearance of the
search bar and search results, on both the homepage and
throughout the Help Center. |
| New conversation | Help Center > Customization
Pane |
Controls the appearance of the
new conversation forms on your Help Center. Applies to any
pages whose URLs look like this:
https://yourcompany.kayako.com/conversation/new/#. |
| My conversations | Help Center > Customization
Pane |
Controls how any logged in
user's open conversations appear on the Help Center. Your
changes will be reflected on
https://yourcompany.kayako.com/conversations. |
| View conversation | Help Center > Customization
Pane |
Controls the appearance of an
individual conversation, when viewed from the Help Center.
Applies to any pages whose URLs look like this:
https://yourcompany.kayako.com/conversation/view/#. |
| Reply | Admin Area > Brands > Email Templates | Controls the appearance of the reply emails that are sent automatically to your customers, whenever your team replies to their conversation. |
| Notification | Admin Area > Brands >
Email Templates |
Controls the appearance of any notification or reminder emails that
are sent by the system because of an automation. |
| Satisfaction Survey | Admin Area > Brands >
Email Templates |
Controls the appearance of your satisfaction survey emails, which are sent by automations. |
Kelly O'Brien