Handling incoming conversations with Kayako Messenger has lots of advantages, but you don't always want to wait for your customers to come to you. With engagement rules, you can proactively start conversations with customers over Kayako Messenger.
Whether you use them to help your sales team convert visitors into customers, or to enable your support team to offer help to customers when and where they need it, engagement rules make real-time messaging a two-way street.
For each engagement rule, you'll set criteria to define which customers Kayako should send a message to. You'll also customize the message content and have the option to auto-assign any ensuing conversations to a team or agent.
In this article, we'll have a look at how engagement rules work, and then walk you step-by-step through creating and configuring them.
Understanding how engagement rules work
Engagement rules consist of two elements, much like Kayako's other automation methods: a set of criteria and an action to perform for any conversation that meets those criteria.
Criteria for engagement rules all have to do with the behavior or identity of a visitor to your website or app. You'll choose one or more of the following criteria, to target your messages:
- Page URL – the URL the visitor is on
- Browser language – the visitor's browser language
- Number of visits – the number of visits to a page within a session
- Number of pages viewed – the number of pages visited within a session
- Time on site (in min) – the time the visitor has spent on the site, in minutes
- Time on page (in sec) – the time the visitor has spent on the page, in seconds
- Business hours – the business hours for team from which the conversation is coming
- Page title – the title of the page the visitor is on
- Referrer URL – the URL of the page the visitor arrived from
- City – the city the visitor's IP address is in
- Country – the country the visitor's IP address is in
- Engaged during this visit – whether the visitor has already been proactively engaged during this session
Actions for engagement rules consist of selecting who the message should appear from, writing up the message itself, and optionally auto-assigning any conversation started from these engagements to the person or team the message comes from.
IMPORTANT NOTE: If you're using triggers to auto-assign Messenger conversations, you'll need to add a condition so your triggers only fire on unassigned conversations. Otherwise, your triggers may re-assign your proactive conversations.
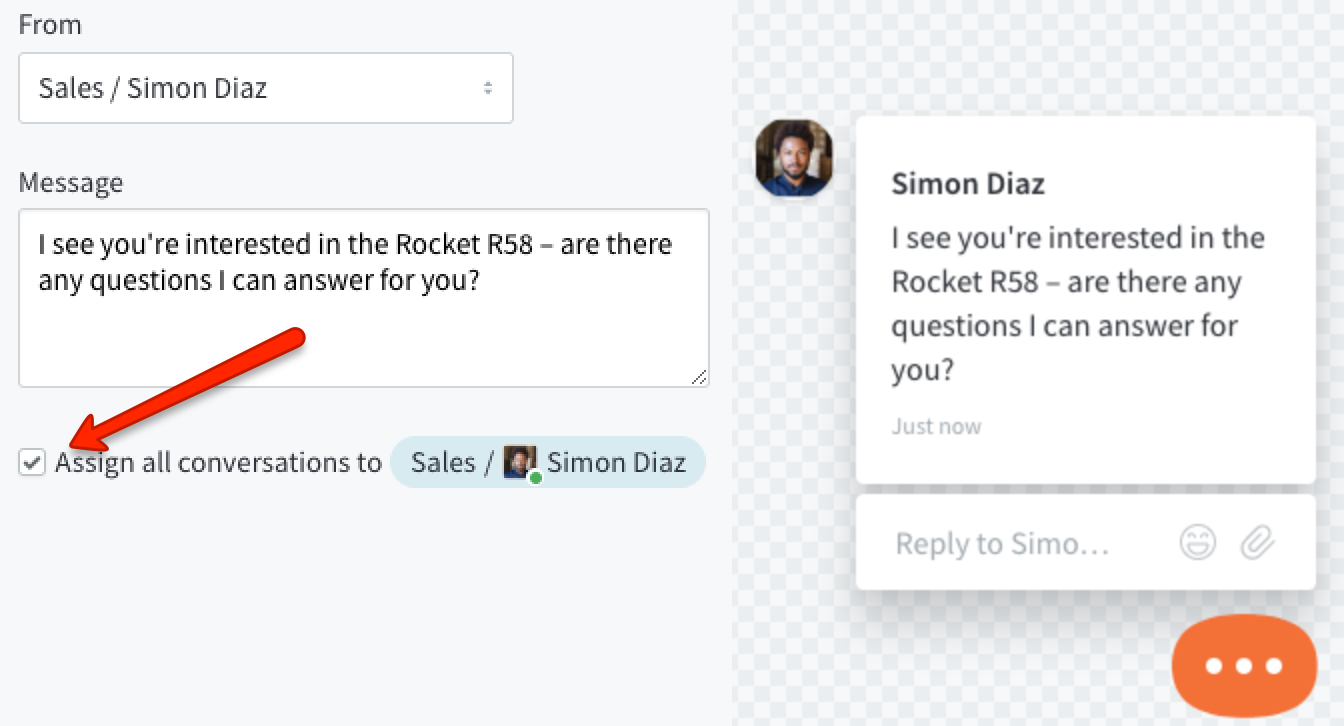
You can do a lot of different things with engagement rules, but one common use for them is to offer help to customers as they're shopping. Let's look at an example using Brewfictus, our favorite fictional coffee equipment supply company. Say a potential customer is on Brewfictus' site, looking at the product page for a Rocket R58 espresso machine.
The Brewfictus team can create an engagement rule that will pop up a message to any customer on that product page, once they've been there for 15 seconds. If the customer responds, a new conversation is created in Kayako, and if the box is ticked, will be auto-assigned to the selected team or agent.
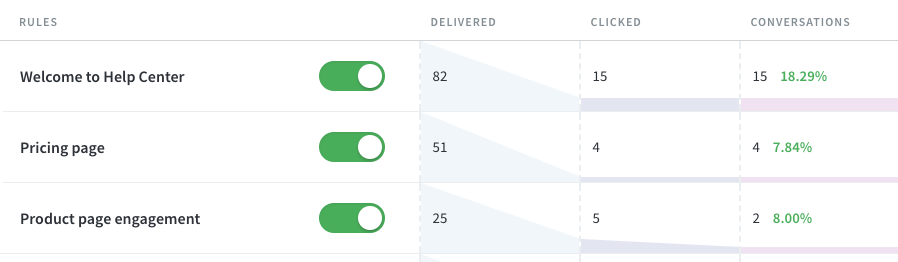
Finally, as you start to proactively message your customers, you'll be able to check your engagement rates from the admin area. You'll see stats on how often the message was delivered, how often the visitor clicked into Messenger, and how many conversations were started for each engagement rule.
Now that you've got a sense for how engagement rules come together, let's go through the process of actually creating one.
Creating and configuring engagement rules
The specifics of defining your engagement rule will depend on what you want the rule to do, but the process will be the same. Below we'll walk through creating an example rule – we'll use the shopping-assistance one described above – but you can define whatever criteria and message text you need.
NOTE: To add or edit engagement rules in Kayako, you will need an administrator account with the 'Manage automations' permission.
To configure an engagement rule:
- Sign in to the admin area.
- Click on Engagement rules in the sidebar.
- Here you'll be able to see any rules you've already created.
NOTE: You can click and drag rules to change the order in which Kayako enforces them. - Click the New engagement rule button.
- Add a descriptive Rule title, for example, 'Product page engagement'.
- Next, let's say our first condition is to aim the rule at visitors to product pages. We could start with 'Page URL', 'contains', '/product'.
NOTE: The actual value for this would depend on your own product page URLs. - But we don't want to be too aggressive, so click the +And button, and define a second condition for 'Time on page (in seconds)', 'greater than or equal to', '15'.
- Now we have our target audience defined, time to configure the message. In From select a team or agent you want the message to come from.
NOTE: You'll see your changes reflected in the preview pane to the right. - In Message add the copy you want to use for the message itself. Keep it short and sweet.
- Check the Assign all conversations box, if you want Kayako to automatically assign these conversations to the agent or team the message is coming from.
- When you're done, click the Save button to create and enable your new engagement rule.
Kelly O'Brien