The core purpose of the Help Center is to house your customer-facing support docs. But many teams have more complex requirements for their self-service content.
By using Kayako's visibility restrictions, you can host not only content that's restricted to certain customers but also content that's only visible to your own support agents.
In this article, we'll cover how visibility works on the Help Center, and then walk you through how to restrict your content to particular groups of customers or agents.
NOTE: For help getting started with content creation, make sure you check out our article on managing your Help Center content.
Understanding Help Center content visibility
All restrictions to your Help Center content are controlled at the section level. You can choose from three basic tiers of access:
- Anyone (completely public) – This default tier is for your public-facing docs. Anyone can see content in these sections.
- Logged-in users only – Select this to restrict the section to customers who have logged in. You can get even more specific, by restricting the section to logged-in customers with a particular user tag.
- Agents only – This option can be used to create an internal Help Center for some or all of your team. You can use this option to create sections accessible to any logged-in agent. You can also get more particular, by restricting sections to agents in particular teams, agents with particular user tags, or both.
Sections are set to public by default. If all of the sections within a particular category have the same visibility settings, those settings will apply to the category as a whole.
Now that we've covered what your visibility options, let's take a closer look at how to set customer and agent restrictions.
Restricting content for your customers
To control which of your end users can see which content on your Help Center, you can add customer visibility restrictions to individual sections.
NOTE: To set customer restrictions on a section, you will need an agent account with the 'Manage the Help Center' permission.
To restrict a section to some of all of your logged-in customers:
- Sign in to the Help Center.
- Go to the section you want to restrict.
- Click the Edit Section button.
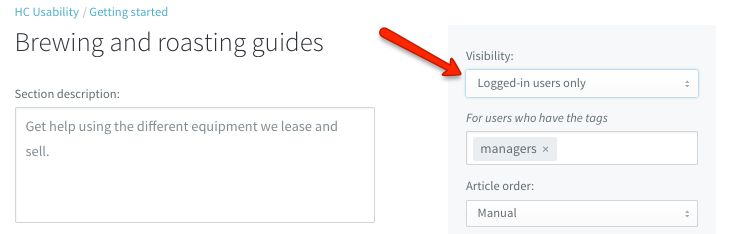
- From the Visibility dropdown, select 'Logged-in users only'.
- To keep the section visible to any logged-in customer, save your changes now.
- To restrict the section to specific customers, enter a tag in the For users who have the tags field. The tag value can be anything you like – short and descriptive is best.
- Click Update button to save the section's visibility settings.
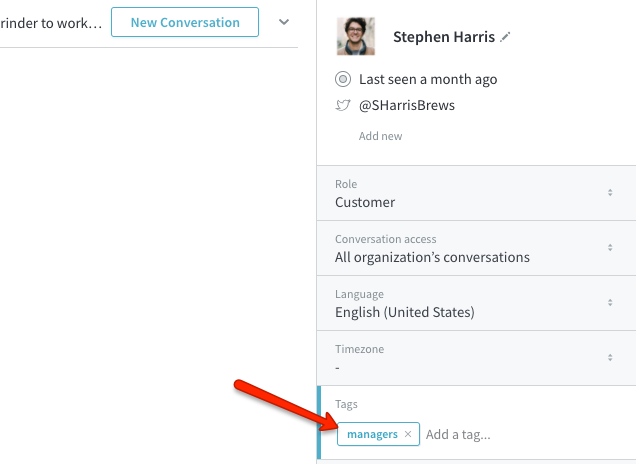
- To grant users access to a tag-restricted section, search for the user in the agent area, and add the section's tag to their user profile:
-
You can add or remove a tag from a customer's profile at any point, which will grant or revoke their access to the corresponding sections.
-
Click the Update properties button to save your changes.
NOTE: All logged-in agents and admins will still be able to see content in customer-restricted sections, regardless of their user tags.
Publishing internal content for your teams
To add internal content to your Help Center, which will only be visible by logged in agents and admins, you can add agent visibility restrictions to individual sections.
NOTE: To restrict sections to some or all of your logged-in agents, you will need an agent account with the 'Manage the Help Center' permission.
To restrict a section to some of all of your logged-in agents:
- Sign in to the Help Center.
- Go to the section you want to restrict.
- Click the Edit Section button.
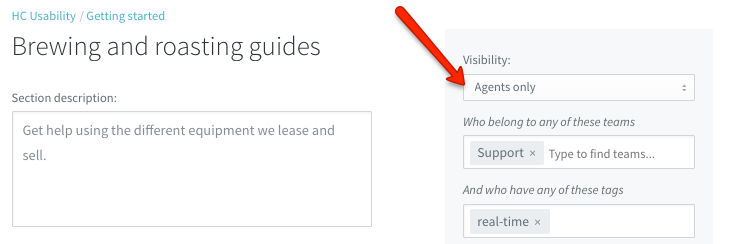
- From the Visibility dropdown, select 'Agents only'.
- To keep the section visible to any logged-in agent, save your changes now.
- To restrict the section to specific agents, you have two options:
- Type the name of a team, to restrict the section to agents belonging to that team.
- Add one or more tags to restrict the section to agents whose profiles have that tag.
NOTE: You can use both of these options in combination – any agent belong to one of the teams AND matching one of the tags will have access. - Click Update button to save the section's visibility settings.
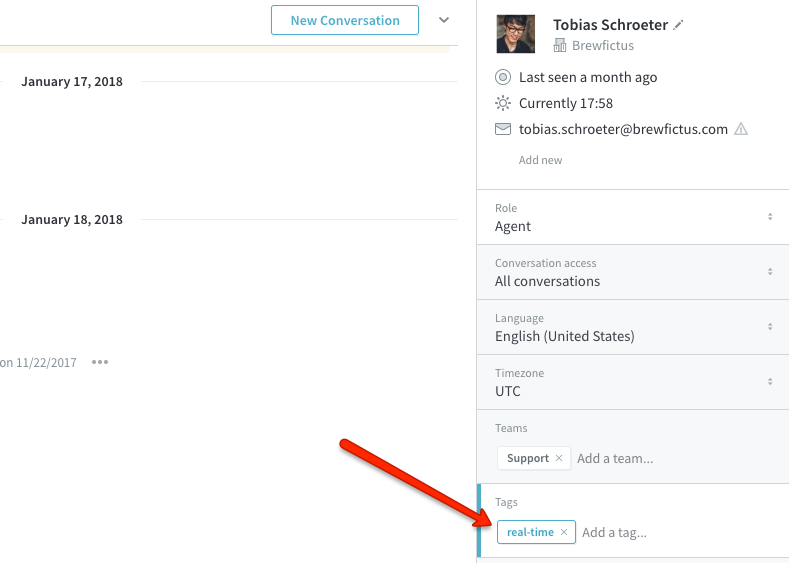
- To grant agents access to a tag-restricted section, search for them in the agent area, and add the section's tag to their profile:
-
You can add or remove a tag from a customer's profile at any point, which will grant or revoke their access to the corresponding sections.
-
Click the Update properties button to save your changes.
NOTE: All logged-in admins will still be able to see content in agent-restricted sections, regardless of their teams or user tags.
Kelly O'Brien