Most support organizations field many types of questions from their customers, from technical support to sales inquiries. Forms let you customize the data you collect for different types of support conversations. When your customers click on the Start a conversation link in the Help Center, they'll choose the type of help they need, which will take them to the proper form.
Customizing your forms can ensure that your support team gets the information they need, right out of the gate. In this article we'll explain how Kayako manages forms, and then walk you through how to tailor your forms to match the types of support conversations your team is having.
Understanding how forms work
From the customers' perspective, forms are often their first point of contact with your support team. They'll be using forms to communicate the problems they're facing. Because of that, it's important to design your forms thoughtfully — the better designed your initial questions are, the easier it will be to solve your customers' problems quickly.
When the customer contacts your team, Kayako immediately creates a conversation using all of the information captured in the form. This means that you can use custom forms to get proactive about the kind of information you see in your support conversations. You can also create custom forms that aren't visible to your customers at all. Your support team can use these internal forms to categorize specific types of conversations, without exposing the forms to your customers.
When customizing forms, you'll start out with a set of standard system fields that Kayako includes on every form. From there you can choose to add as many custom fields as you like to request specific details from your customers. You'll need to create the custom fields you want to use, before you start building your form.
Customizing forms
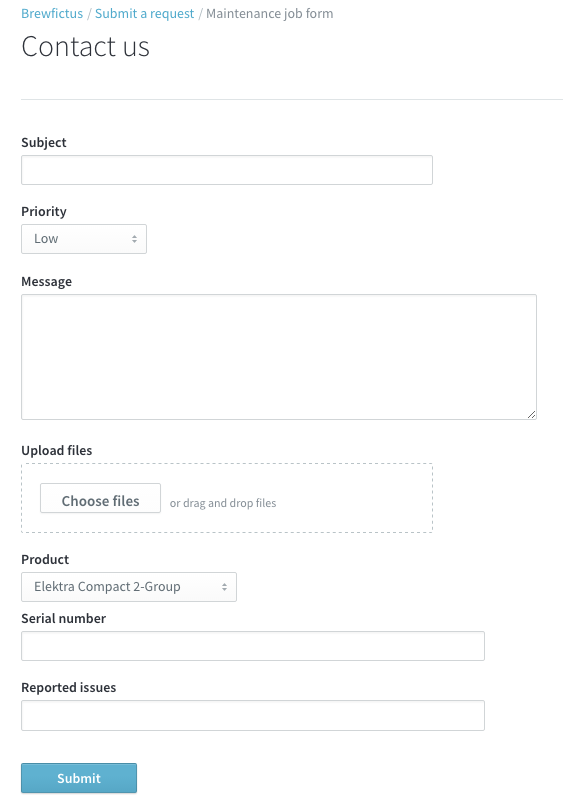
As an example, let's say you want to add a custom form for support conversations about broken or malfunctioning products. Let's walk through creating a product repair form that's designed to gather information not only about the customer and their problem, but also the specific details of the product they're using. Remember that you'll need to create custom fields for any product-specific data you want to collect, before you can add them to a form.
NOTE: To add or edit forms in Kayako, you will need an administrator account with the 'Manage conversation fields' permission.
To create a new form:
- Sign in to Kayako and go to the admin area.
- Under the 'Conversations' heading, click Forms.
- Here you'll see a list of all of the forms that have already been created. Click the New form button to start customizing a new one.
- In the Form title for agents field, add a descriptive internal title for the form. For our product example, let's go with 'Product Repair Form'.
NOTE: This title is internal, and will appear in the admin area but not to customers. - Next, since we want this form to appear as an option when customers are starting a new conversation, check the Customers can see and select this form box.
NOTE: If you were creating a form for internal use only, you would leave this box unchecked. - In the Form title for customers field that appears, add a descriptive title for your customers. This title will appear under the heading 'What kind of help do you need?' so let's go with something like 'My product is malfunctioning or broken'.
- In the Form description for customers field add a brief description to clarify the kind of information we're asking for, like 'Please enter your product details and a description of the problems you're experiencing, so we can find a solution for you quickly!'
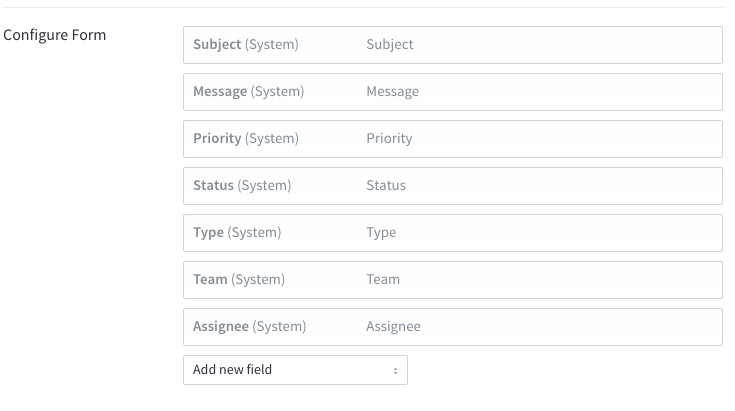
- Under the 'Configure form' heading, you can see a list of standard '(System)' fields that are included on every form by default. You can't edit these, since Kayako needs this info to start a new conversation.
- At the bottom of the list, click the Add new field dropdown to see a list of additional fields.
NOTE: If you don't see any additional fields here, you'll need to create them using custom fields. - Select any additional fields you want, in the order you'd like them to appear on the form. For this example we might want to add a 'Product Model' and 'Serial Number' field.
- If you add a field by accident, you can remove it by hovering over it on the list and clicking the Remove from form link that appears.
- When you've added the fields you want, click the Save button at the bottom of the page to create your new form.
Congratulations, you've customized your first form! Your customers will now be able to use it when contacting your team from the Help Center.
Kelly O'Brien