In Kayako, your support team's interactions with your customers are grouped into conversations . Kayako's conversation format is designed to help you have more informed, more contextual, and all-around more human support interactions. They are also where your team will spend most of their time.
Every time a customer reaches out with a question, Kayako creates a new conversation, which then captures every bit of customer interaction until their question is resolved. In addition to capturing all communication — whether it happens over email, chat, Twitter, Facebook, etc. — conversations can also include private notes, only visible to the support staff, as well as input from collaborators outside of the support team.
Conversations are also interspersed with details about the customer's experience from across their journey. That means that any actions they take within Kayako – like searching the Help Center or reading self-service content – as well as any actions they take in external systems you've integrated with Kayako will all be visible from their conversations.
In this article, we'll go through a detailed breakdown of what you're seeing when you look at a conversation, and then we'll walk you through the basics of replying to your customers.
Understanding the elements that make up a conversation
Conversations represent the intersection of a lot of Kayako's different structures and systems. Since they are your primary point of interaction with your customers, there's a lot that goes into making those interactions go smoothly.
Let's take a quick look at all the different elements of a conversation page. For each conversation, you'll see a page that looks like this:
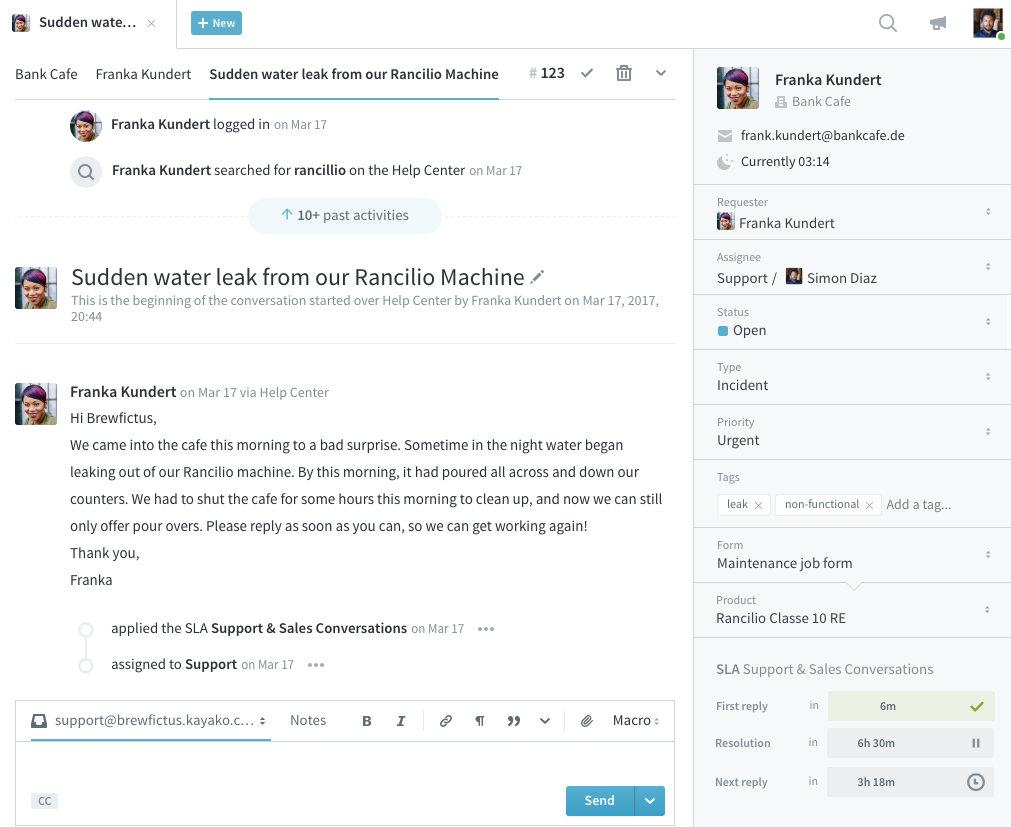
Let's break it down a little bit, starting up top.

There area a couple of things to take note of here:
- Customer and organization journey tabs — To the left of the conversation subject, you'll see the name of the customer and their organization. You can click on either of these tabs to quickly review the customer or organization journey, making it easy to put the current conversation into the context of the customer's overall experience.
NOTE: For more detail on journeys, have a look at our article introducing conversations and journeys . - 'Complete' checkmark — When an agent resolves a conversation, they can quickly mark it 'Complete' by clicking the checkmark on the menu bar.
- Trash button — Similarly, if an agent needs to trash a conversation, they can do so by clicking the trash icon here. You can still access trashed conversations from the 'Trash' view in the agent area homepage.
- Action menu — From the dropdown to the far right, you can select either 'Merge conversation,' which allows you to combine multiple conversations into one, or 'Hide activities,' which toggles whether Kayako displays activity notifications alongside conversation messages.
Next, let's take a look at customer pane.
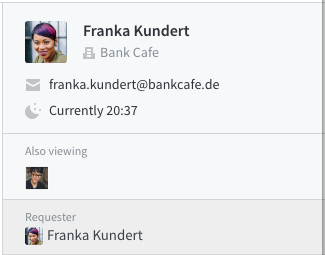
Here, you'll see some basic information about the customer, including their profile picture, organization, and local time. Beneath that, if there are other agents looking at the conversation, Kayako will display their profile picture here. Finally, you'll see the name of the customer the conversation belongs to.
Next down the sidebar are the conversation particulars.
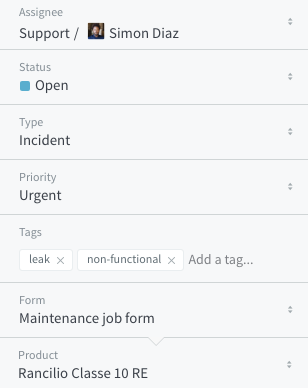
You can edit any of these fields in order to assign, categorize, prioritize, and otherwise move the conversation along:
- Assignee — Assign the conversation to a particular team or agent.
- Status — Update the current status of the conversation.
- Type — Select the type of conversation it is, making them easier to sort and assign.
-
Priority — Specify the conversation's priority, to make sure your team can focus on the most important conversations.
NOTE: If you're on the Enterprise plan, you can also edit the values for systems fields like 'Status', 'Type', and 'Priority'.
- Tags — Add as many tags as you like. They're helpful when you want to sort and catalog your queue or build automations for particular types of conversations.
-
Form — Select what form the conversation uses, which determines whether and which custom conversation fields appear in the sidebar.
NOTE: If you change forms for a conversation, you won't lose any information in custom fields, even if they're no longer visible. - Custom fields — Specify the product the customer is using. This is an example of a custom field that has been added to the 'Maintenance' form.
Last but not least on the sidebar are the details about the conversation's SLAs.
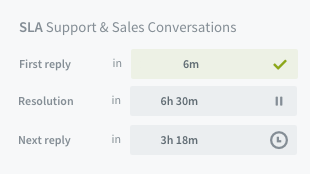
Here you can see not only which SLA the conversation is subject to, but also timers for the reply and resolution targets for the conversation.
Finally, let's take a quick look at main body of the conversation. Here you'll see all messages, private notes, updates from your agents, and customer activity – from both Kayako and any external systems you've connected.
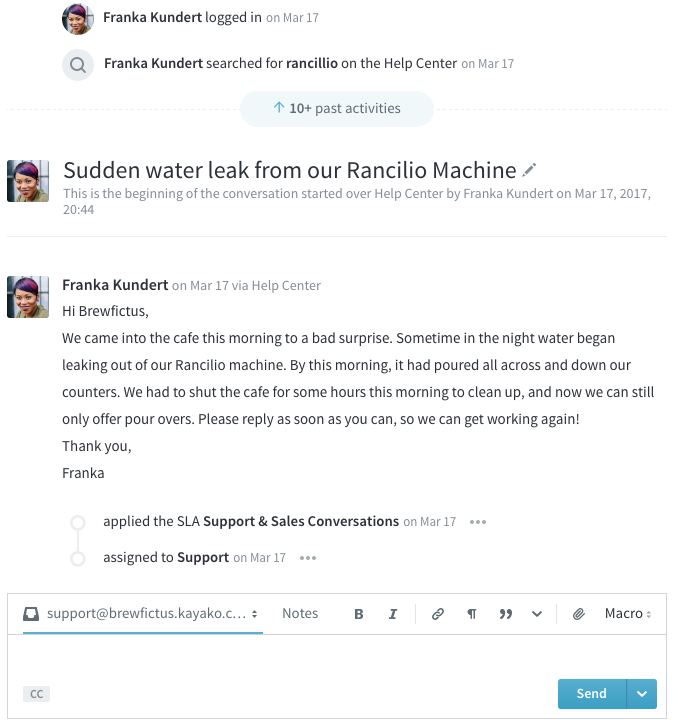
Activity and updates are sorted with the most recent at the bottom. Your team will most likely spend most of their time in the reply box, at the bottom of the timeline. From here, they have a full range of tools for responding to your customers:
- Channels — From the 'support@brewfictus.kayako.com' dropdown, you can choose the channel by which you'd like to reply to your customer. Your options here depend on what channels the customer has on their profile. Let's say they have added their email, Twitter, and Facebook accounts — you'll be able to choose from any of those channels for your reply.
- CC button — The CC button also gives you the option to loop other people in on the conversation, like collaborators or other support agents.
- Notes — You can also add notes to the conversation from the 'Notes' tab next to the dropdown. Notes can only be seen by agents and collaborators, not by the customer.
- Formatting — You have basic formatting options available, helping to make your responses as clear and easy-to-read as possible.
- Attachments — You can attach files to your messages via the paper clip icon. (NOTE: there is a 20MB attachment limit per post)
- Macros — Your support team can select from any macros you've defined in Kayako in the 'Macro' dropdown on the right.
- Messages — In the 'Enter your reply here...' text box, you can write up your response to your customer.
- CC – At the bottom of the reply box, you can specify any recipients you'd like to copy on your message.
And there you have it! Now that you know your way around a conversation, let's take a quick look at what you'll need to do to make changes to your own.
Basic steps for responding to or updating a conversation
Your team will probably spend the majority of their time with Kayako replying to customer conversations. Although the details will vary from conversation to conversation, the basic steps are the same.
NOTE: To reply to a customer in Kayako, you will need an agent or administrator account with the 'Reply publicly to conversations' permission.
To update a conversation:
- Sign in to Kayako and go to agent area.
- Navigate to the conversation you want to update. You'll see a page similar to our example conversation above.
- Let's say your customer needs a response to their email, and quickly because they're about to leave for vacation. Select the channel you want from the dropdown at the bottom of the timeline.
- Type the body of your message in the reply text area.
- Since your customer is on a time crunch, from the Priority field on the sidebar, select 'Urgent'.
- Then, since you'll now be waiting on the customer for a reply, change the Status field to 'Pending'.
- Click the Submit button to save your changes and send your message to the customer!
- Before we leave, we're also going to leave a note about the customer's upcoming vacation. Click the Note link above the reply box.
NOTE: Read more in our user guide article about private notes. - Add a quick note about the date the customer is leaving.
- Click the Submit button to add the note to the timeline. It will only appear to your team – your customer will not be able to see it.
And that's it! You've successfully replied to a customer conversation.
Kelly O'Brien