For teams that rely on Salesforce for their CRM, the Kayako for Salesforce app is the best way to integrate your customers' sales interactions with their Kayako support journey. By adding the app to your Salesforce account, you can easily and securely share data between the two systems, giving your team a complete picture of your customers' experience.
The Kayako for Salesforce app works in two directions:
- On the Salesforce side, it allows you to display recent Kayako support conversations directly on your contact screens. For example, say a customer has a high-priority conversation in Kayako that's waiting on a resolution. With the Kayako for Salesforce app, that information will appear right on the customer screens, equipping your account managers with the insights they need to approach your customers most effectively.
- On the Kayako side, the app will display recent Salesforce activity on customer's conversations and journeys. For example, let's say your support team has an open support conversation with a contact that your sales team has marked as a high-value lead. That information will automatically be displayed within the support conversation, so your agent can prioritize the conversation as needed.
In this article we'll cover how the Kayako for Salesforce app works, and walk you step-by-step through the process of setting it up with your accounts.
Understanding how Kayako for Salesforce works
The Kayako for Salesforce app is available through the Salesforce AppExchange. From there you can install it into your Salesforce account.
Once it's installed, there are three more steps to getting it up and running:
- Logging into the app and configuring a new remote site, allowing Salesforce to talk to your Kayako.
- Modifying one or more of your Salesforce page layouts to display information from your Kayako conversations.
- Enabling the Send Events to Kayako option, so Salesforce will push important context over to your Kayako conversations and journeys.
All of these configuration steps take place from the Salesforce side. You won't need to do anything in Kayako to get it talking to Salesforce.
Once you've got the app fully configured and set up on your page layouts, Salesforce will display an overview of the latest five conversations for that contact — including the conversation subject, status, priority, time since last update, and a snippet of the most recent last message.
All of this will appear in its own section, under a 'Kayako' heading:
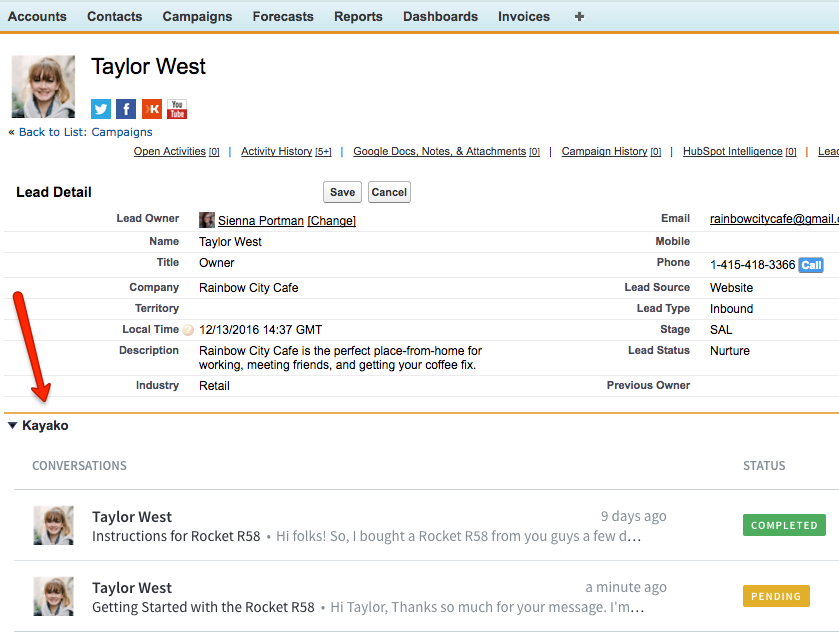
Clicking on any of the conversations in the list will take you directly to Kayako, where you can see the full conversation history.
On the Kayako side, enabling Salesforce to send events to Kayako means that notifications will appear on the relevant customers' conversations and journeys anytime one of the following happens:
- New lead created
- Lead status changed
- New opportunity created
- Opportunity state changed
- Opportunity amount changed
- Opportunity lost
- Opportunity won
- Opportunity owner changed
- Account owner changed
- Account type changed
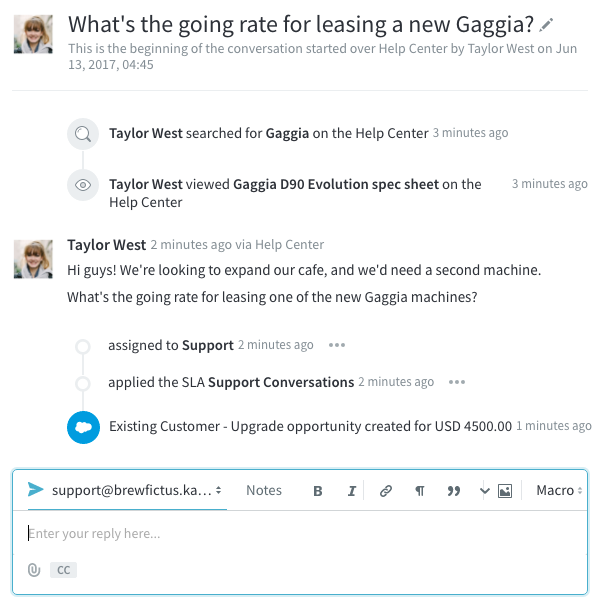
For example, you can see here how a new opportunity will appear in the relevant conversation, so your team won't miss a thing:
Below, we'll go through each configuration step in detail, to get you up and running with Kayako for Salesforce.
Installing and configuring the Kayako for Salesforce app
Your first task is to install the app to your Salesforce instance from the AppExchange. From there we'll go through authenticating the app, and setting Kayako up as a new remote site in Salesforce.
NOTE: To configure the Kayako for Salesforce app, you'll need a Salesforce user account with the 'Customize Application' permission.
- Go to the AppExchange listing for Kayako for Salesforce.
- Click the Get it Now button.
- Click the Log in to the AppExchange button.
- Log in with your Salesforce credentials, if you haven't already.
- Click the Install in Production button to add the app to your live Salesforce account.
NOTE: If you'd like to experiment with the app in a non-production environment, you can click Install in Sandbox instead. - Review your account information. Check the box saying you agree to the terms and conditions, and click the Confirm and Install.
- Enter your Salesforce credentials, and click the Log In button.
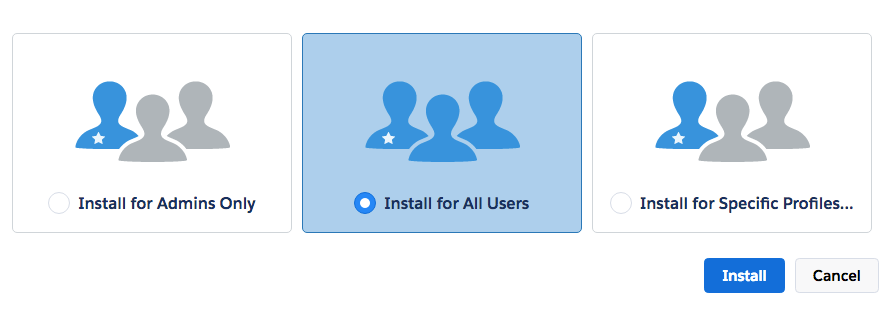
- Next, you'll need to select which of your Salesforce users you want to install the app for:
- Select Install for All Users to make Kayako conversation details available to all your Salesforce users.
- Click the Install button.
- The installation will take a few moments. When it's done, you'll receive a confirmation email, and you'll be redirected to the 'Installed Packages' of your Salesforce account. You should see 'Kayako for Salesforce' on the list:
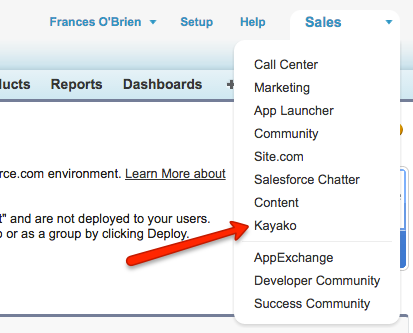
- Now that you've installed the app, time to configure it. From the top right dropdown, select 'Kayako':
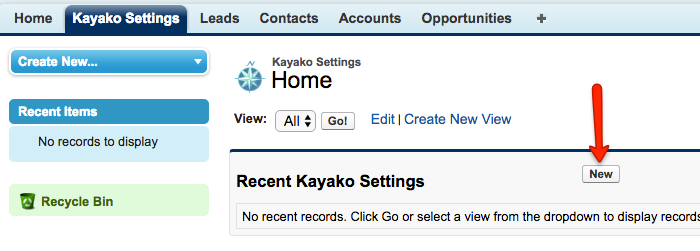
- Switch to the Kayako Settings tab.
- Click the New button:
- Here, you'll enter your Kayako credentials, which Salesforce will use to authenticate the app. You'll want to use an administrator account to log into Kayako.
- In the Username field, enter your Kayako username.
- In the Password field, enter your Kayako password.
- In the Domain field, enter the full address for your Kayako instance, for example, 'yourcompany.kayako.com'.
- Check the Active box to enable Salesforce to use these credentials.
- Click the Save button.
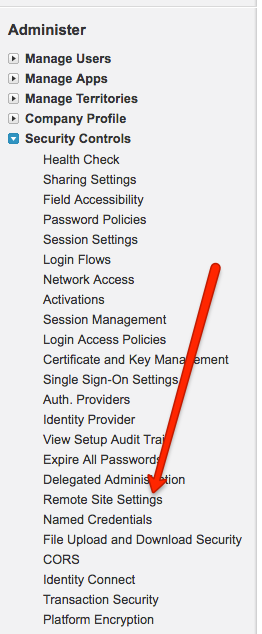
- Now that you've saved your credentials, it's time to tell Salesforce where to find your instance. Click on Setup.
- From the (frankly overwhelming) sidebar, under the 'Administer' heading, open Security Controls and click Remote Site Settings.
- Click the New Remote Site button.
- Here, you'll add your Kayako instance as one of Salesforce saved remote sites. In the Remote Site Name field, type in a name for your site, for example 'YourCompanyKayako'.
- In the Remote Site URL field, enter the full URL for your Kayako instance, for example, 'https://yourcompany.kayako.com'.
- Leave the Active box checked.
- Click the Save button.


And that's it! Your Salesforce account is now fully equipped to talk to your Kayako instance. Read on for help with adding Kayako conversation details to your Salesforce screens.
Adding the Kayako conversation overview to your Salesforce page layouts
You can choose to display Kayako conversation details on any of four Salesforce screens: Account, Contact, Lead, and Opportunity. For each screen, you'll need to create new section in the page layout, and specify which Kayako for Salesforce components to display. You'll follow the same steps, regardless of which screen you're editing.
To add Kayako conversation details to a Salesforce page layout:
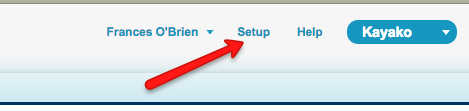
- Click the Setup menu link.
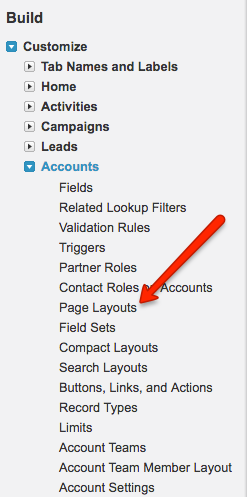
- From the sidebar, under the 'Build' heading, open Customize, open Accounts and click on Page Layouts.
- Find the layout you want to modify — Account, Contact, Lead, or Opportunity — and click the Edit link to the left.
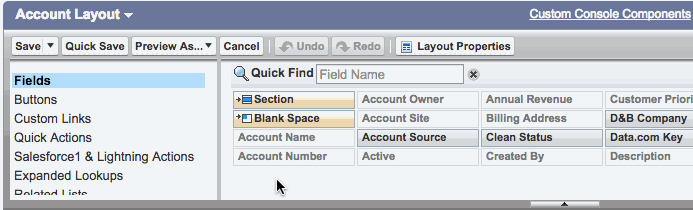
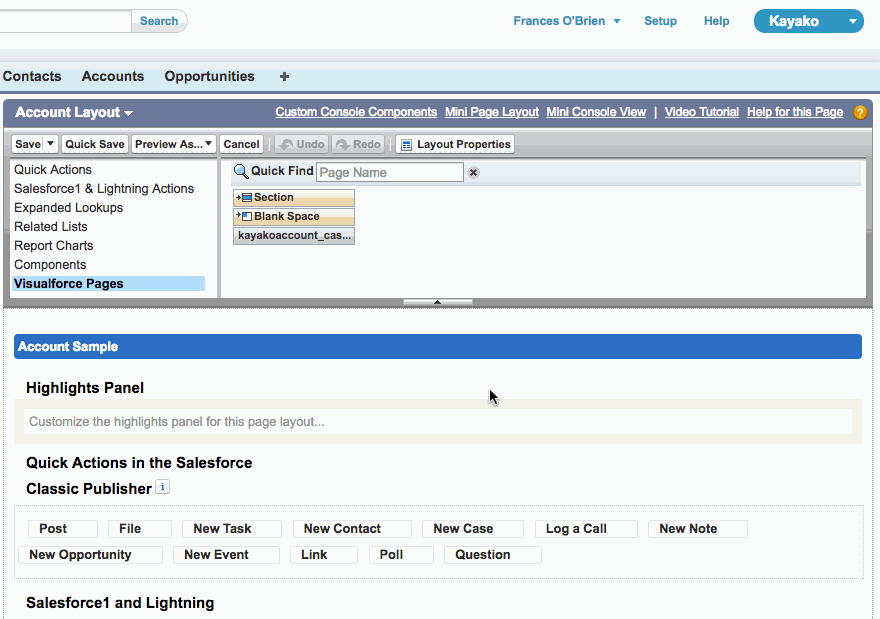
- Up on the top pane, in the left-hand menu, scroll down and select Visualforce Pages.
- From here, you can drag a new section down onto the page layout. You can place the section anywhere, but here's an example, that will add a new Kayako section right below the basic account details:
- Your steps for this process start with scrolling down to where you want to add the section.
- Click and drag the Section object from the top panel.
- In the 'Section Properties' window that appears, type 'Kayako' in the Section Name field.
- Leave the Detail Page and Edit Page boxes checked.
- Select the 1 Column option.
- Click the OK button.
- Great! Section created. Next step is to add the component that will tell Salesforce what Kayako information to display.
- Back on the top pane, in the Quick Find box type 'Kayako'.
- Find the component with 'caselist' at the end of its name. The full name of the object will vary depending on the page layout your editing:
- For 'Account' layouts, the component is
kayakoaccount_caselist - For 'Lead' layouts, the component is
kayakolead_caselist - For 'Opportunity' layouts, the component is
kayakoopportunity_caselist - For 'Contact' layouts, the component is
kayakocontact_caselist
- For 'Account' layouts, the component is
- Click and drag the caselist component down onto the new 'Kayako' section you just created.
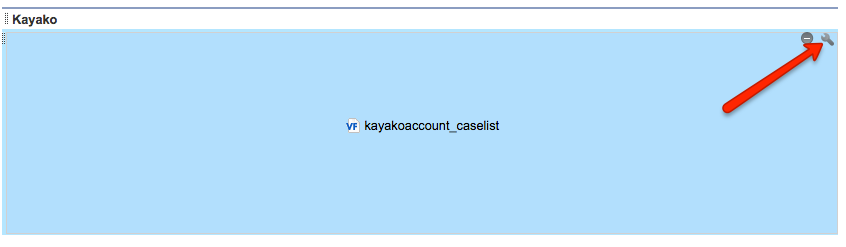
- Okay, almost there! Your last step is to resize the section so that it's large enough to display a few conversations at a time. Hover over the 'caselist' component, and click on the wrench icon in the upper right.
- In the 'Visualforce Page Properties' window, enter '500' in the Height (in pixels) field.
- Click the OK button.
- Back up on the top pane, click the Save button to save your changes to the page layout!
Congratulations! Now you'll be able to see Kayako conversation details from within you Salesforce views. You can follow the steps above for any additional page layouts you want to add a Kayako section to.
Read on for instructions for enabling Kayako for Salesforce to send information to Kayako.
Enabling Salesforce to send event notifications to Kayako
You can authorize the Kayako for Salesforce to send Kayako event notifications that will be displayed in customer conversations and journeys. Enabling this option is a matter of checking or unchecking a box.
To enable Salesforce notifications:
- In the Kayako for Salesforce configuration pages, go to the Kayako Settings tab:
- Click the link for your active Kayako setting to go to the detail view.
- Find the Send Events to Kayako checkbox and make sure it's checked.
NOTE: You can also uncheck this box at any time, to suspend notifications into Kayako from Salesforce.
- Click the Save button after you make your changes.

And that's everything! With all of these settings enabled, your Kayako and Salesforce accounts will paint a more complete picture for your sales, support and success teams.
Kelly O'Brien