Congratulations and welcome to the new Kayako! Now that you've made the switch, you're ready to reestablish the defaults and business rules that didn't come over automatically in the migration process. For these steps, keep the worksheet you completed in Phase I close at hand, so you can reference it while you're building things.
Below we'll walk you through how to recreate each rule or function using the new Kayako:
- Creating automated notifications
- Setting a default status when agents reply to conversations
- Updating conversations with pending follow-ups
- Recreating your email parser rules
- Blacklisting banned emails
- Rebuilding your workflows
- Setting SLA schedules using business hours
- Establishing SLAs
- Adding escalations for your SLAs
- Organizing your Help Center content
NOTE: To recreate your business rules, you will need to be signed into Kayako with an administrator account that has the 'Manage automations' and 'Manage SLAs and business hours' permissions.
Creating automated notifications
To recreate your notification rules, you'll be building triggers. For each notification rule, you'll create a new trigger that will send a notification for any conversation that matches the criteria you select. You'll also be able to choose the team or agent that the notification should go to, and customize the message's contents.
To recreate your notifications:
- Pull up the 'Notifications' tab on the migration worksheet.
- Go to the admin area.
- Click on Triggers in the sidebar.
- Click the New trigger button.
- Add the title for your first notification rule from the worksheet.
- In Rule Settings select the channel that this notification should apply to. Leave it set to 'Any' to apply this notification rule to all channels.
- From the Select a condition dropdown,
select the first criteria listed in your migration
worksheet.
NOTE: If you need help determining which criteria to choose, refer to our reference article on conditions and actions. - Add any additional criteria listed for this notification rule by clicking either the +Add a new condition or +AND link.
- Scroll down to 'Perform the following actions'.
- From the Select an action dropdown, choose either 'Notification:Email a user' or 'Notification:Email a team'.
- From the Select a receiver dropdown, select the team or user to send the notification to.
- Add the subject line to the Subject field, and the notification body to the Message field.
- Click the Save button to create your new automation.
- Repeat the steps above for each notification rule in your migration worksheet.
Setting a default status when agents reply to conversations
In Kayako Classic, for each view you could set the default status for tickets that your staff had replied to. Let's say you had a view set up for your 'Sales' department, and the had the default status set to 'Pending' . To recreate this in the new Kayako, you can build a trigger that will update the status of any sales conversation, whenever your staff replies.
To automatically update a conversation's status when your team replies:
- Pull up the 'Default Reply Status' tab on the migration worksheet.
- Go to the admin area.
- Click on Triggers in the sidebar.
- Click the New trigger button.
- Add a title for your first default reply status listing. Let's say we're working with the sales example, in which you might name it 'Default replied-to status for sales conversations'.
- In Rule settings select which channel the trigger should apply to. For our example, we'll leave it at 'Any'.
- First, let's limit our trigger to sales conversations. From the Select a condition select 'Conversations: Team, equal to, Sales'.
- Click the +AND button, so we can limit the trigger to replies from your staff.
- From the Select a condition dropdown, select 'Conversation Update Event: Current User's role, not equal to, Customer'.
- Click the +AND button again, to add a condition to tell the trigger to fires only on replies, not notes.
- From the Select a condition dropdown, select 'Post: New Post, equal to, Added and visible to customers'.
- Next, from the Select an action dropdown,
select 'Conversation: Status, change, Pending'.
NOTE: You can choose any status you like here. If you're on the enterprise plan, you can create your own custom statuses, as well. - Click the Save button.
- Repeat the steps above for any other default statuses in your migration worksheet.
Updating conversations with pending follow-ups
For your conversations that have follow-ups pending, the easiest way to update them will be to look them up by conversation ID in the agent area and update them manually from there. If you need help, check out our user guide article about responding to conversations.
NOTE: If there are common follow-ups that your team uses, it might be worth looking into either automating them with monitors and triggers, or adding them as macros.
Recreating your email parser rules
Most email parser rules are recreated on the new platform using triggers. The only exception is any pre-parse rules you may have. For a pre-parse rule that blocks messages from a certain user, you can just look them up in the agent area and disable their user account. For pre-parse rules that catch spam messages, Kayako's built-in spam filters will catch those messages and suspend them.
For post-parse rules, you can build triggers to act on any email messages that come into the address you specify.
To add a trigger for a post-parse rule:
- Pull up the 'Email Parser Rules' tab on the migration worksheet.
- Go to the admin area.
- Click on Triggers in the sidebar.
- Click the New trigger button.
- Add in the title for your email rule.
- In Rule settings select 'Email'.
- From the dropdown that appears, select 'Incoming email message'.
- From the Select a condition select 'Mail: Received at'.
- Select 'equal to' and then choose the email address that the rule applies to.
- Add any additional conditions listed for this rule by clicking either the +Add a new condition or +AND link.
- Scroll down to 'Perform the following actions'.
- From the Select an action dropdown, choose the first action listed for your rule.
- Add any additional actions listed for this rule by clicking the +Add a new action link.
- If you want Kayako to stop processing other automations after this automation, click the +Add a new action link, and then from the Select an action dropdown, select 'Flow Control: Stop processing other rules'.
- Click the Save button to add your trigger.
- Repeat the steps above for any other post-parse rules on your migration worksheet. NOTE: If you ever need help determining what a certain condition or action does, refer to our reference article on conditions and actions.
Blacklisting banned emails
To suspend any messages coming in from email addresses you've banned, all you need to do is copy and paste a list of those emails into the blacklist on the 'User Registration' page of the admin area. For detailed instructions, refer to the registration section of our security and registration article.
Rebuilding your workflows
So, you have a couple of options for recreating the workflows you recorded on your migration worksheet. You can build them ad hoc, so your team can select them and apply them as needed. Or you can convert them into true automations, that run in the background on any conversations that match their criteria.
To build ad hoc workflows, you'll want to use macros. In the new Kayako, macros will let you reuse not only commonly used replies, but also commonly used conversation updates. When looking at a conversation in the agent area, your team can select a macro from a list in order to apply it to the conversation. To rebuild your workflows this way, follow the instructions in our article about how to create macros.
If you'd rather have your workflow rules running in the background, without any input from your staff, you can recreate them using triggers and/or monitors. These will work behind the scenes, applying the updates you specify to any conversations that match your criteria. To automate your workflows, follow the instructions in our article about how to build triggers and monitors.
Setting SLA schedules using business hours
Your SLA schedules will need to be recreated on the new platform using the business hours feature. Telling Kayako what hours each team of agents are active will enable you to set SLAs and time-based automations according to your team's active hours.
To recreate your SLA schedules:
- Pull up the 'SLA schedules' tab on the migration worksheet.
- Go to the admin area.
- Click on Business Hours in the sidebar.
- Click the New business hours button.
- Add the title of your first SLA schedule to the Title field.
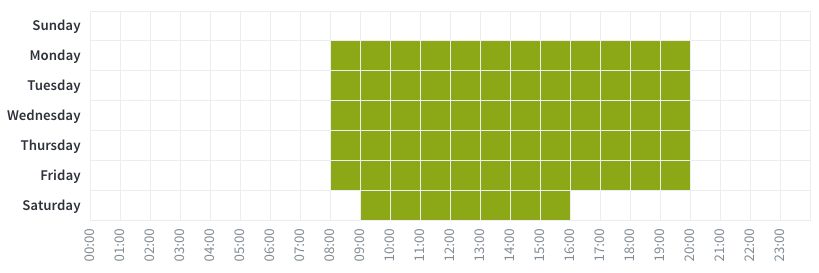
- Below the 'Business Hours' heading, you'll see a weekly
timetable. Click and drag across the cells for the days and
hours your team will be working. For example, let's say your
main support team has coverage from 8:00-19:00 on
Monday-Friday, and 9:00-15:00 on Saturdays. Your table would
look like this:
- Click the Save button to create your new set of business hours.
- Repeat the steps above for any other SLA schedules on your migration worksheet.
NOTE: For more information, check out our user guide article on business hours.
Establishing SLAs
Recreating your SLA plans in the new Kayako is just a matter of adding a new SLA for each plan from the admin area.
To recreate an SLA Plan:
- Pull up the 'SLA Plans' tab on the migration worksheet.
- Go to the admin area.
- Click on SLAs in the sidebar.
- Click the New SLA button.
- Add the title of the first SLA plan on your list.
- Add a description of the SLA in the Description field.
- From the Select a condition dropdown,
choose the first condition for the SLA plan.
NOTE: For help choosing a condition here, refer to our reference article on conditions and actions. - If your SLA plan has other conditions, click the +AND button or +Add another condition link to add them.
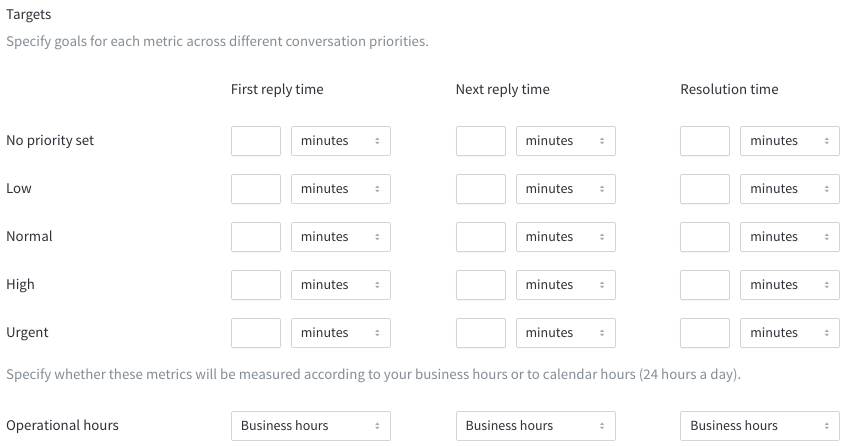
- Under the 'SLA Targets' heading, have a look at the
table:
- For each conversation priority, enter the targets for each SLA metric. You enter a value in minutes, hours, or days.
- In the Operational Hours row, you can select whether Kayako should count time based only on your team's business hours or based on calendar hours.
- Click the Save button to create your new SLA.
- Repeat the steps above for any other SLA plans on your migration worksheet.
Adding escalations for your SLAs
In the new Kayako, you can add escalations using triggers or monitors.
If you're recreating escalations based on how much time a conversation has before it breaches an SLA target, then you'll want to use monitors. These automations are time-based, which lets you use them to schedule updates based on a conversation's SLA targets.
If you're creating escalations that should be carried out the minute a conversation breaches one of its targets, then triggers are the way to go. Each trigger is event-driven, so any time one of its conversations breaches a target, the trigger will fire and perform the actions you've defined.
To recreate a time-based escalation:
- Pull up the 'Escalations' tab on the migration worksheet.
- Go to the admin area.
- Click on Monitors in the sidebar.
- Click the New monitor button.
- Add the title of the first time-based escalation on your list.
- From the Select a condition dropdown, select 'SLA' and 'equal to' and select the SLA plan for this escalation.
- Click the +AND button to add another condition.
- Open the Select a condition dropdown scroll down to the 'SLA' section.
- Choose one of the 'Time to', 'Time since', or 'Time
remaining' options and set a number of hours for this
monitor.
NOTE: For help choosing a condition here, refer to our reference article on conditions and actions. - From the Select an action dropdown, choose
the first action for the escalation.
NOTE: If you need help determining what each action does, refer to our reference article on conditions and actions. - Use the +Add a new action link to define any additional actions.
- Click the Save button to create your new escalation.
- Repeat the steps above for any other time-based escalations on your migration worksheet.
To recreate a breach-based escalation:
- Pull up the 'Escalations' tab on the migration worksheet.
- Go to the admin area.
- Click on Triggers in the sidebar.
- Click the New triggers button.
- Add the title of the first event-based escalation on your list.
- In Rule settings select 'System'.
- From the dropdown that appears, select 'SLA breach'.
- From the Select a condition dropdown, select 'SLA' and 'equal to' and select the SLA plan for this escalation.
- Click the +AND button to add another condition.
- From the Select a condition dropdown,
select 'System: SLA metric breached' and 'equal to' and then
select which type of breach the escalation is for.
NOTE: You can make your escalation work for more than one type of breach by adding them as additional conditions. - If your escalation has other conditions, click the +AND button or +Add another condition link to add them.
- Scroll down to 'Perform the following actions'.
- From theSelect an action dropdown, choose
the first action listed for your escalation.
NOTE: If you need help determining what each action does, refer to our reference article on conditions and actions. - Add any additional actions listed for this rule by clicking the +Add a new action link.
- Click the Save button to create your new escalation.
- Repeat the steps above for any other breach-based escalations on your migration worksheet.
Organizing your Help Center content
To build out your Help Center's new categories and sections, open up the 'KB Hierarchy' tab on your migration worksheet. Then follow the instructions in our article on managing Help Center content to create your categories and sections. Once your new hierarchy is in place, you can move your articles to their new homes.
NOTE: To reorganize your Help Center content, you will need to be signed into Kayako with an agent or administrator account that has the 'Manage the Help Center' permission.
To move your Help Center articles into your new hierarchy:
- Navigate to the article you want to edit.
- Click the Edit article button.
- From the Show in section dropdown, select
the category and section you want to move the article to.
- Click the Save button to move the article.
- Repeat with the rest of your articles.
And that's everything! Congratulations!! Your upgrade is complete. Now all that's left is to get your team up and running on the new platform. We'd recommend checking out our 'Starting out with Kayako' article for advice on where to go next. And of course, feel free to reach out to our support team with any questions.
Kelly O'Brien